Tuesday, December 29, 2009

Organize This - A New Year Freebie


Most of us are probably intending to ring in 2010 with high hopes of being more organized throughout the year. Me! Me! Me! I'm part of that group! I want to be more organized, more logical, more structured. I spend hours each day searching for lost shoes, missing socks, misplaced keys, my cell phone... the list goes on and on.

So, I am gifting free labels for you. I was designing these for my own use and figured I might as well share these cute little goodies. Right click the image, save to your desktop, and print them to size. These tags are great on card stock or photo paper... you can even laminate them if you'd like. Although some of the tags are already labeled, I've included blank ones so you can customize them to suit your needs. Happy New Year!


Sunday, December 27, 2009

Tulle and Eyelet Poof Skirt


My baby was blessed today. Doesn't she look so sweet? It was kind of last minute. My little brother plays college basketball and it's been difficult finding a weekend that he could get away from his hectic game schedule. So, last night I hurried and whipped this dress together. It took about two hours from beginning to end, but I was definitely taking my time to get it just right. Although my version was for a baby blessing, this could easily be moderated into a print or something not so formal. I definitely intend to make oodles of these for the summer time.

1. CUT OUT YOUR PIECES

Cut out the skirt. Measure the waist as well as the distance between the belly button to the bottom of the shin. Add about 3/4 of the width of the skirt to the initial measurement. For example, if the waist measured 19 inches, like my daughter's, you'll want to make it 33 inches. Cut out a rectangle of fabric fitting your measurement. Mine, was 33"x 9."

Cut your tulle. Cut out a rectangle that is twice as long as your measurement. For example, my skirt is 9" long, so I'm going to cut the tulle to be 33"x18."

Cut your elastic. If your waist measured 19", you want to cut your elastic to be one to two inches shorter than the initial waist measurement. This is so the elastic will hold tight and be kept from falling down when it's worn. I cut my elastic to be 18".

Cut the waistband casing. My daughter's waist measure 19 inches, so I cut the waist band 20 inches. The elastic I'm using is 1.5" so I cut the casing to 4.5", allowing enough room for your seam allowance and for attaching the casing to your skirt.

2. Construct the casing. Fold the casing piece in half, right side together, and iron a crease at the fold.


Leaving a 1/4" seam allowance, sew together the rough edges. Turn the casing right-side out and iron flat.


3. Sew the hem. Lay out your largest rectangle, fold the bottom edge over twice and iron flat. Sew along the inside edge of the fold, making the hem extra sturdy.


4. Attach the tulle. Fold the tulle in half and pin the folded end to the top of your largest piece of fabric.


Sew along the top, attaching the tulle to the "fluttery" part of your skirt.


5. Attach skirt to the casing. Put the skirt portion and the casing right sides together, and start pinning them together. This is also the step where you establish the pleating.

I find it easiest to pin each end of the skirt to the ends of the casing. Then, pin the center of the skirt to the center of the casing. This way, the pleats are evenly disbursed. To form the pleats, pinch the skirt and tulle and pin that bunched fabric to the casing.


Continue pinching, bunching, and pinning, until the entire skirt is pinned evenly to the casing. Sew the skirt and tulle to the casing.


6. Insert elastic into the casing. Attach a large safety pin to the end of your elastic and feed the elastic into your casing. Once the safety pin has been strung all the way through the casing, pin each end of the elastic to the casing to hold it in place during the next step.


7. Finish your goodie! Pin the rough edges of the skirt, right sides together. Stitch it up, again using a 1/4" seam allowance. Turn the baby right side out and ta-da! You are DONE! Cute and poofy and I LOVE IT! I'll post the construction of the top for my next tutorial.

Wednesday, December 23, 2009

Coddled in Corduroy

Being a lover of all things beautiful, especially ones that can be made, I was quite taken by this lovely corduroy skirt. It's so charming, don't you think? I have dreams of one day owning a chunky corduroy sofa. I just love the texture of it.

I can't wait to get to the fabric store after the holidays, buy up some yardage of this stuff, and get to skirt-making.

Thanks bunches to Sachiko, whose cleverness I've swiped for this post. Wanna visit her? Check her out here to see the complete info on this DARLING goodie.

Fabric Flower Bracelet

I have gobs of fabric scraps in my stash, leftover from previous projects. But, most of them are too small to do anything substantial with. I was watching iCarly with my nieces a few nights ago and she was wearing the cutest fabric flower necklace. I'm not a huge necklace girl, but I liked the concept. So I evolved the idea into this. I won't lie, it took a good hour and a half, but I'm a fan of how it all turned out...

First take some household items of varying sizes that can help you trace out some fabric circle. I used a baby bottle, a Salt City candle, and a spool of thread. Find a color scheme you like, and cut out the fabric circle.


Next, stitch around the outside of circle, being sure to stick close to the edge. If you want to be extra safe, you can even run a little fray-check around the edge of the fabric.


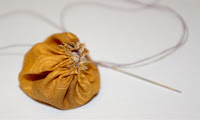
Once you've made it all the way around the edge, pull the thread tight until the circle forms a pumpkin-looking shape.


Push your needle through the center of the gathered top, and thread through the back where you can tie off your thread. I even did a few passes back through the top and back down to make it a bit more durable.


Continue this process with all of your fabric circles and press them flat with an iron. Once you've finished making all of your flowers, lay them out to find a grouping that works for your taste.


Cut a strip of wool felt that's wide enough to accommodate the grouping of flowers, and long enough to wrap around your wrist. Start sewing on your flowers. Stitch through the center, and continue to stitch small stitches around the outside of the flowers to make it stay in place. I let the outer flowers hang over the felt a bit so the felt is more hidden.

I embellished my flowers with vintage buttons that I found in a tin from my Grandma Tresa. But, I know most thrift stores have bins of buttons you can buy loads of for a STEAL!


The great thing about working with wool felt is, it holds its own pretty well. So, button holes are super easy. First wrap the strip of felt around your wrist and mark with a disappearing quilting pencil where you want your button hole to be.


Then, take a small and SHARP pair of scissors, and cut a straight slit where you've marked your button hole. No sewing is necessary for this step, but I did do a small stitch around the outside of my slit simply for looks.


Sew on your button. I prefer a button that is the same color as my felt, so the flowers, the REAL centerpiece of the bracelet, can take center stage.


And, ta-da! A little whimsical and feminine fabric flower bracelet. Now, do I keep this for myself? Or, give it to my little sister for Christmas... it's a true debacle.

Tuesday, December 22, 2009

Featuring.... ME!

Okay, so I know I'm the new kid on the crafty blog block, but I am already making friends. Yay. Ruffles and Stuff featured my first tutorial ever, the t-shirt beanie, as their daily feature today. The author of that site is a creative genius. Check her out here.

Saturday, December 19, 2009

T-Shirt Beanie


I don't know about you guys, but I have t-shirts that I have saved from over ten years ago! Most of them are wearing thin and are destined for the trash heap. But, I came up with an idea to salvage a few of them. The best part about this tutorial is it's fast, easy, and you don't have to be an expert seamstress to get it to look virtually perfect.


First take an old t-shirt and a beanie that fits whoever it is you're making this for. I'm making mine for my 3 month old daughter. Lay the beanie at the bottom hem of the t-shirt, using the beanie for a pattern. Trace an outline with a disappearing quilting pen, or just hold the beanie firm and cut around it.


After this step, you should have 2 sides for your t-shirt beanie.


Next you're going to cut strips out of another portion of your t-shirt. Do a basting stitch down the center of the strips, being sure to do a reverse stitch at one end to hold it in place.


Pull on of the end strings of the basting stitch, gathering the strip of t-shirt into a ruffle.


Now, start stitching the ruffled strips to the front of your t-shirt beanie. Do strip after strip until you get something like this.

Then, pin the two pieces of your t-shirt beanie right-sides together and sew around the top. The original hem of the t-shirt will act as the bottom of your beanie and should remain open.


Ta-da! You have yourself a very cute, one-of-a-kind beanie. Although I did mine with ruffles, you could do it however you'd like. Just get a little clever and embellish it to your fancy.

Ta-da! My first tutorial blog!

So, here we are at the Rubber Punkin, getting ready to kick off some creative radness. Check back the the first of next week for our tutorial debut. Want a hint? Start digging out some of those old t-shirts you never wear. I've got a good idea brewin.